Showing posts with label Vintaj. Show all posts

Saturday, January 14, 2023

Bead in the New Year Challenge


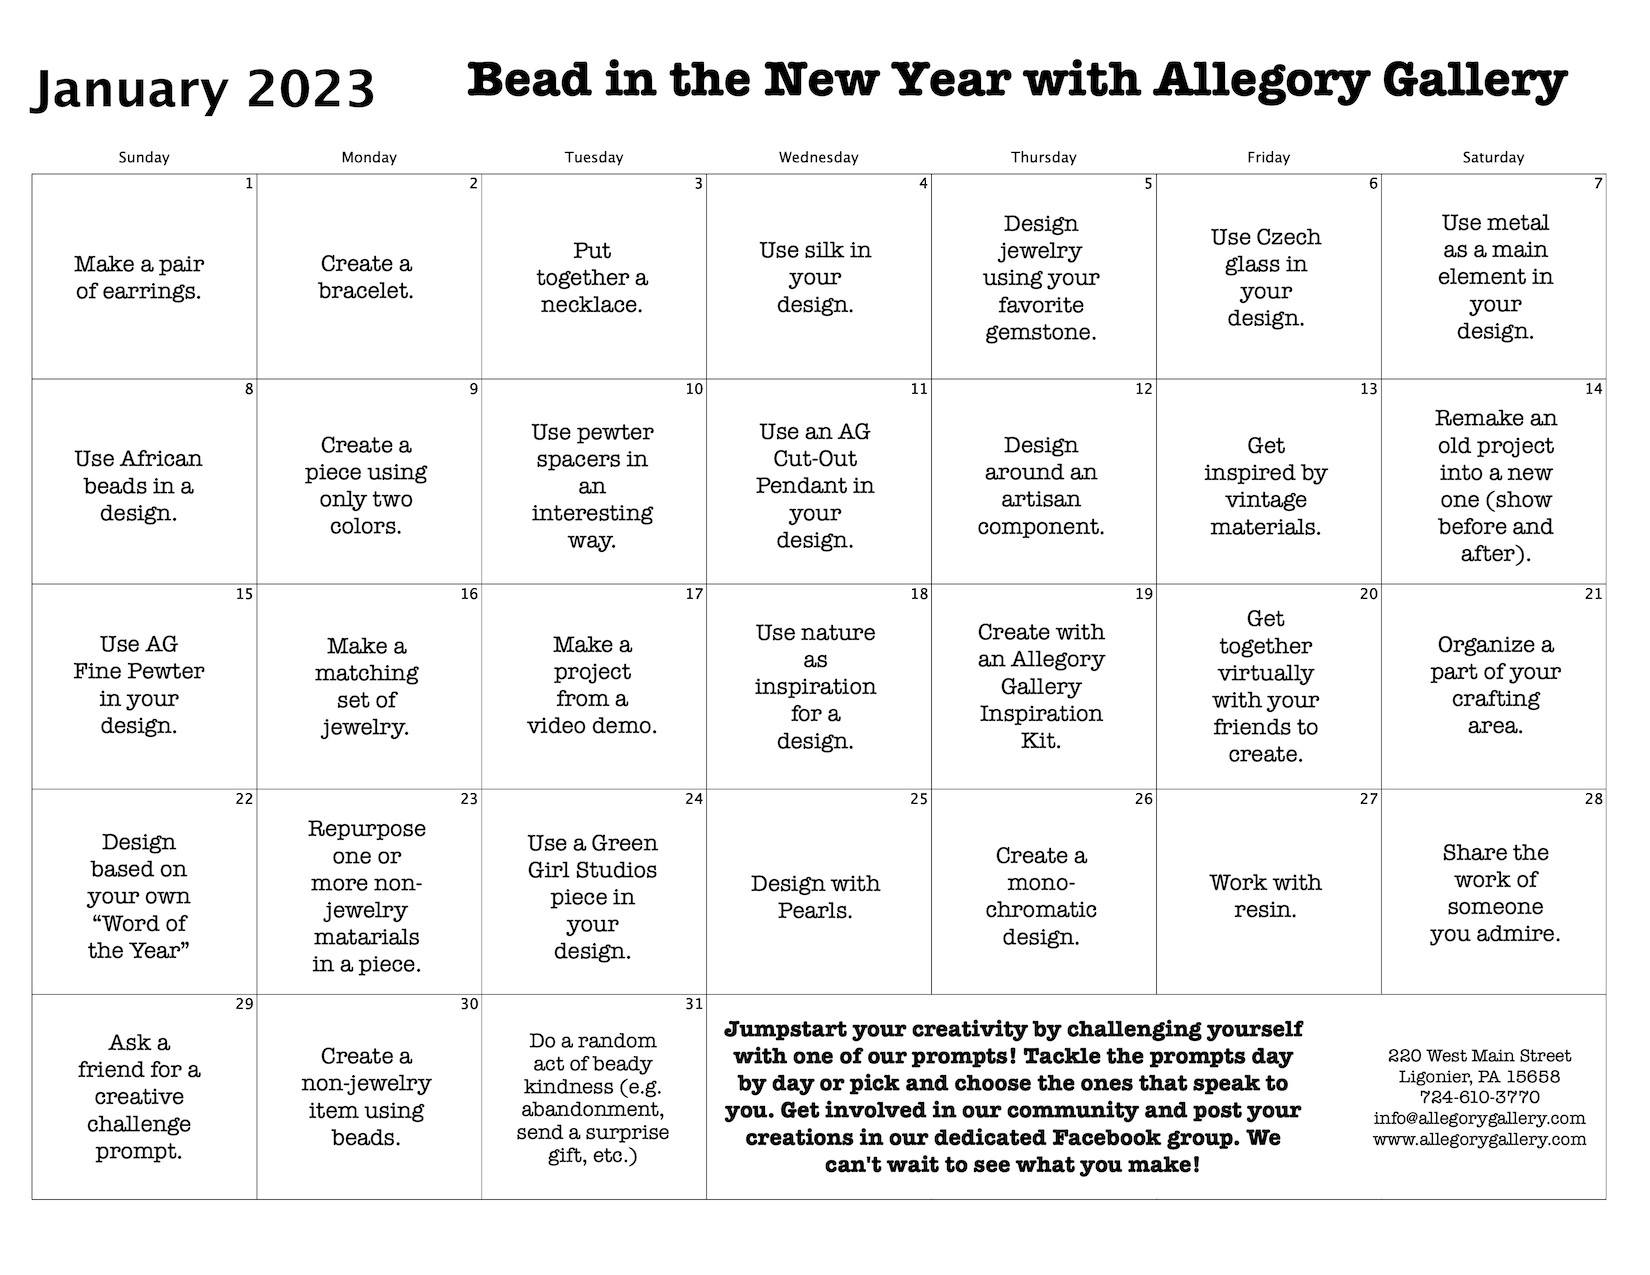
For the last several years my friends Andrew and William at Allegory Gallery have come up with a month of design prompts to inspire their followers and community to be creative.  I always love having some parameters to focus my design process... it keeps me from being overwhelmed by all the bead choices in my stash.  I don't always manage to hit them all, and I'm sure this year will be no different, but I figured I would do what I can and share with you all what I do make!  

The month starts out pretty easy and open in the prompt parameters.... make a pair of earrings (my favorite!!), create a bracelet, put together a necklace.  They sky is the limit otherwise. Started by using some pieces already on my bead mat seemed like the prudent thing to do.  I had been playing with some of the new(ish) Vintaj Ultimate Stains and Jewelry Pop Outs so I had some pieces on the bead table ready to become jewelry.  

Day 1: Make a Pair of Earrings

I started things out by pulling together a pair of earrings using a couple of wooden Jewelry Pop Outs from Vintaj that I stained at the end of the year.  They were still sitting around because I hadn't quite figured out what color beads to pair with them.  In the end, the polymer clay discs from Humblebeads that I used were actually on my bead mat too... the last in a set that I had pulled to make a different pair right after Christmas.  And bonus, I didn't have to put some things away since I used them!


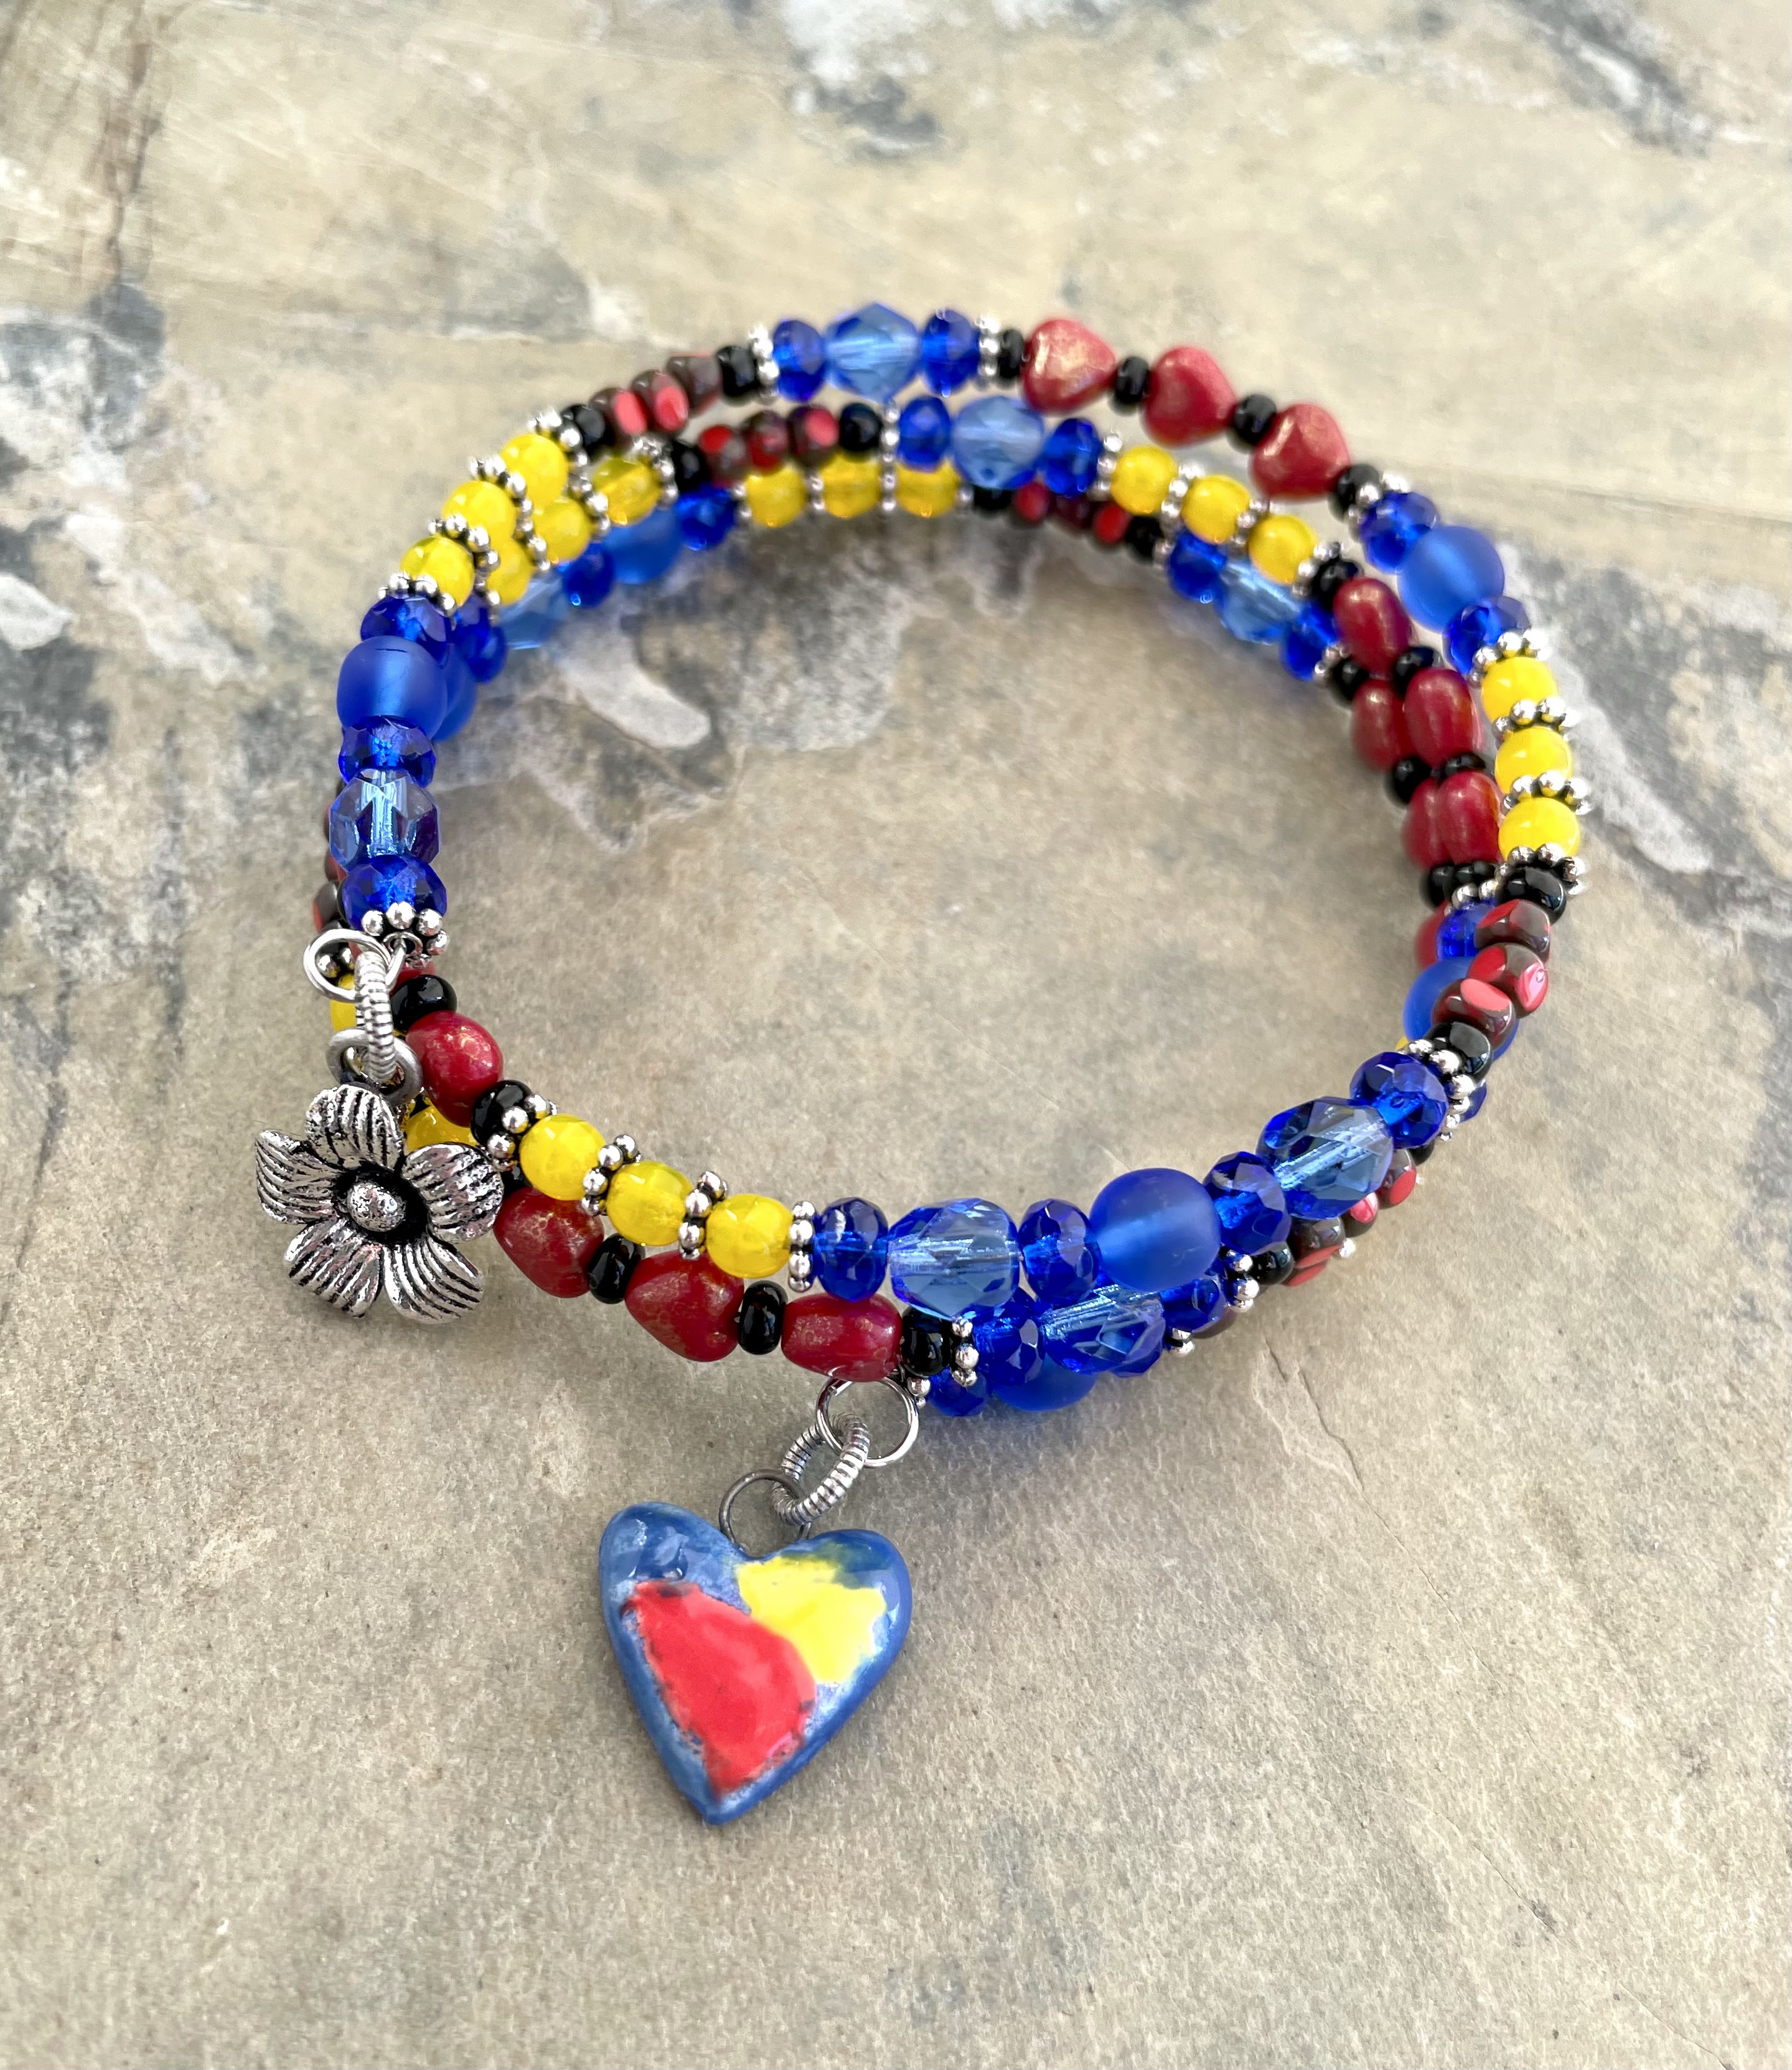
Day 2: Create a Bracelet

Bracelets are not my favorite things to make or to wear.  I'm sure there's a connection there!  I was looking through my art beads for a small charm or two to use on bracelets and I came upon a cute little ceramic heart charm by Mary Harding and it sparked something for me.  I decided that a memory wire bracelet could be fun in the bright colors of the charm.  Unintentionally, it has a little bit of a love for Ukraine feel to it with the colors and hearts.  


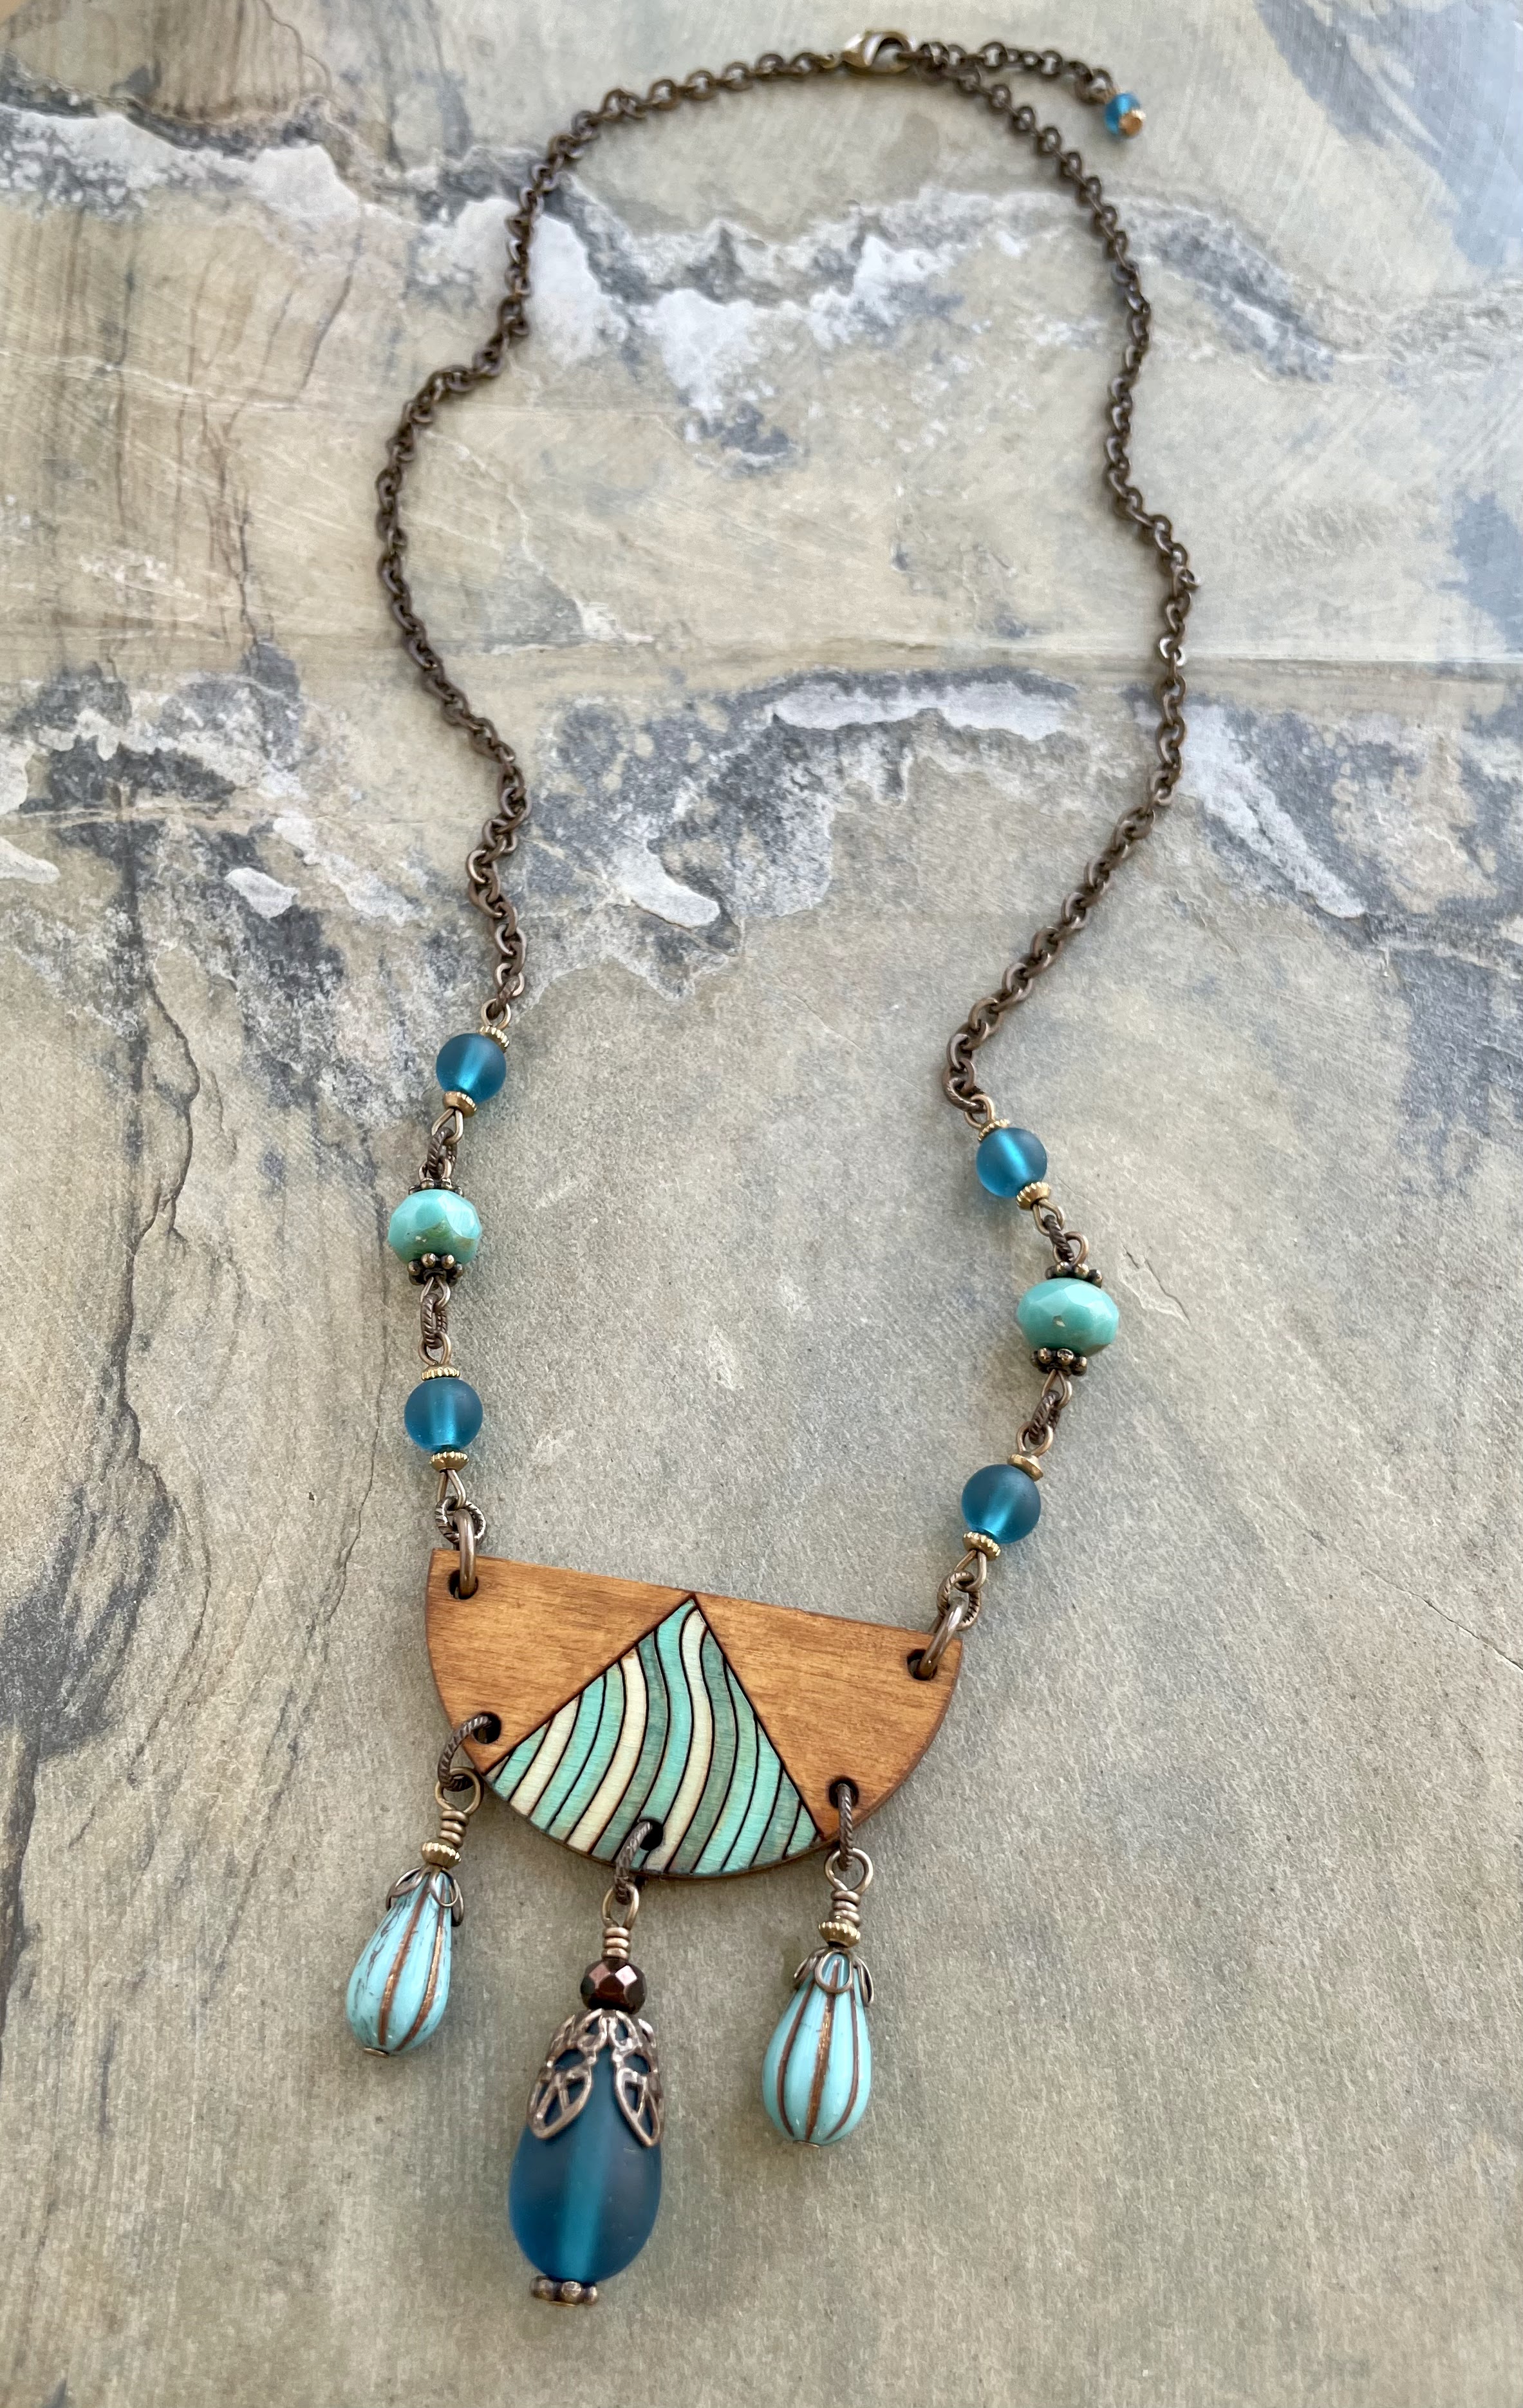
Day 3: Put Together a Necklace

This one was another adventure in playing with stains and pop outs!  I paired the pendant component with a mix of Czech glass, cultured sea glass, and brass in a fairly simple design.

Day 4: Use Silk in Your Design

Ok, this one follows the letter of the prompt but maybe not entirely the spirit.  While I have a stupid amount of sari silk ribbon in my stash, I don't use it a ton.  What I do enjoy using are the little silk wrapped cocoon beads that my friend Anna Pierson of Saga Hus makes!  So, I grabbed a pair of those cocoons and some coordinating lampwork beads by Tanya McGuire that I've had for ages and whipped these little guys up... easy peasy!  


Day 5: Design Jewelry Using Your Favorite Gemstone

How does one pick a favorite gemstone??  There are so many that I love for totally different reasons.  I settled for a pair of matched amazonite teardrop charms I've been hoarding for too long and paired them with some coordinating polymer clay disc beads from Humblebeads and some Czech glass.  I always think that aqua/turquoise tones go so nicely with copper, so I chose that metal and niobium ear wires with copper balls.


Day 6: Use Czech Glass in Your Design

Honestly, I use a LOT of Czech glass in my jewelry designs.... like it's fairly rare that there isn't at least a little bit of Czech glass in a designs.  I really love glass of all kinds and that was part of my entry into making jewelry when I first started.  Anyway, I decided for this challenge that I would only use Czech glass beads and metal spacers, really keeping the focus on the glass.  


Day 7: Use Metal as a Main Element in Your Design

Being a little crunched for time, and needing to get some custom orders done for a friend I'm visiting next week, I went with earrings for this prompt.  My friend had purchased some upcycled tin discs from my friend Anna Pierson and asked me to make her some things... voila!  Tin is metal and also definitely the main element of these bright earrings!


Day 8: Use African Beads in a Design

I don't have a ton of African beads in my stash... so this one was more of a stretch for me.  I did finally find a couple of decently well matched beads in a light aqua color that I could use for earrings.  I kept the design pretty simple, only adding two pewter spacers and a charm.  


Day 9: Create a Piece Using Only Two Colors

My friend's special order strikes again for this prompt!  The blue and white upcycled vintage tins set the color palette for these earrings.  


I'm hoping that I'll have time to follow through on at least some of the rest of the Bead in the New Year prompts before the month is over... so perhaps there will be a part two for this post to come.  I've got a lot of travel coming up so who knows what will happen.  If nothing else, this was a fun way to jumpstart my January!  

Monday, April 20, 2020

Honey Do List April 2020

2020 marks the fifth year that my husband Eric has been giving me a design challenge each month to get me out of my comfort zone and to help clear out my bead stash... it's the Honey Do List 2020!  I know that I'm not the only one who loves a good design challenge, so I'm hoping folks will continue to play along with us!

Here's this month's inspiration and what Eric had to say about it:


Since I haven't been out taking pictures this season yet, I went back in time to my pictures from last summer's trip to the UK.  This was an amazing metalwork gate we discovered in the gardens outside Alnwick Castle and I think gives lots of options for jewelry inspiration!

As soon as I saw Eric's inspiration photo this month, my mind started going a million miles a minute with tons of ideas burbling around in there!  The vines, the leaves, the keyhole, the color and sheen of the iron work, the vibrant greens in the background.

The first thing that I made was all about the iron frame and the swirling leaves and vines.  At last fall's Inspired by Nature Retreat I scored some cool Vintaj Arte Metal deco rivets that I wanted to finally play around with.  If you aren't familiar with deco rivets, they are decorative pieces with sharp prongs on the back that can be punched through paper or material and folded down.  In this case, I used my round nose pliers to roll those prongs into loops.  I thought the shape and pattern of the deco rivets was perfect to represent the functional part of the gate.  I also had some sweet little Arte Metal leaves that were a similar shape to the leaves around the lock.  To add some color to the design, I incorporated some little Czech glass leaves into the mix!


My next design focuses on the keyhole in the gate.  I had several cool escutcheon focals in my stash, but one by Nancy Adams of Round Rabbit (who sadly, no longer makes jewelry components) caught my attention.  With Minnesota being under a Safe at Home order (and having been super cautious about going out even before that order) I've been trying to spend at least some of my time organizing and putting away my ridiculous bead stash that's been all over the basement.  I had just put away some really cool matte finish melon beads that I got last summer and in looking at the pendant knew immediately that they were a great match.  Apparently I've been in a stringing mood lately (also a symmetrical one) so I started playing around with different combinations including some metal "pringle" beads.  


I really wanted to play with some Vintaj metal blanks and riveting and layering for this challenge.  I knew I had a lot of great leaves and vines in my stash so it was really more an issue of trying to narrow it down.  

For this next piece I went for one of my larger brass blanks in a shape that somewhat mimics the leaves on the gate.  I had a copper ivy vine that I thought looked nice draped across the piece.  (It's connected with a jump ring but I did use a bit of super glue underneath to keep it one place.) I embossed the blank and then painted it with a mix of green patinas for a nice contrast.  I kept the color focus on the greens from the photo's background... adding a lampwork bead by Tanya McGuire and some glass links.  This one is long and can be slipped right over your head.


I got a little fancier with this last pendant design.  I went for an Arte Metal circle blank this time that I embossed and highlighted with sandpaper.  (I'm glad that I hoarded a bunch of Arte Metal pieces since they don't make them any more!  Although you can get some of it at the Vintaj Salvage Esty shop.) The black background was to represent the iron work.  I had a fun brass piece perfect for layering and riveting that I'd gotten as a prize or in a goody bag years ago that I wanted to put over that background.  The holes in the brass decoration were a little big for just the rivets, and that would have been boring anyway, so I picked out some little flower spacers to further embellish.  I painted the flowers blue for the sky and the leaves and vines green for the greenery in the background of the photo.  I'm pretty pleased with the end effect.  It's a tiny bit off center, but considering that there were three rivet points, I think I did ok.  The body of the necklace is strung with a ton of Czech glass in shades of blue and green for a bright, happy look.


And, look, my good friend Monica Peña of Mariposa Originals Jewelry played along with an amazing necklace!  I'm smitten with how she used her vintage key and some fun Vintaj components!  Here's what Monica had to say bout her creation:

Great inspiration photo!  I took the opportunity to dip into my stash of vintage keys for this project, combining it with Vintaj medallion and ivy components for the focal, reminiscent of the gate's metalwork.  I softened the overall look with the addition of green Czech glass leaves and Sari silk for a comfortable, lightweight necklace.


Now it's your turn!  Please add links to/photos of your own creations below.  I love seeing what everyone else is making too!  Check back on May 1st to see what Eric has in store for us next month! 
You are invited to the Inlinkz link party!
Click here to enter

Friday, April 17, 2020

We're All Ears April 2020 :: Safer at Home


I'm so glad to see the We're All Ears Challenge back this month over on the Earrings Everyday Blog!  Earrings are my favorite thing to make so I truly look forward to this monthly challenge from my friend Erin Prais-Hintz.

As I type up this blog post it is April 8th and Governor Walz of Minnesota has just extended the stay at home order another two weeks until May 4th.... so the theme is super timely.  I'd really like to challenge each of you to do your best to reframe your view about being home right now.  We aren't "stuck at home," we are Safe at Home.  I wake up each day so thankful that I have plenty of food, a home that provides shelter and plenty of comfort, access to a variety of means for communication, lots of books to read, plenty of movies and shows I'd like to watch, and, of course, a stupid amount of beads to keep me busy.  So, to commemorate this strange time of social distancing and stay at home orders, I've created a mini collection of house jewelry for your viewing pleasure!

First up, a totally sweet pair of enameled houses from Gardanne Beads.  The white on the rooftops is appropriate for all the April snow we've been having in my neck of the woods, lol.  These houses are a little bit chubby so I decided to keep the rest of my design fairly compact.  I just added some cute teal Czech glass flowers with bronzed edges and tiny faceted hematite in a bronzey plating.  I do so look forward to a time when real flowers bloom around our house!


I also managed to snag some of Blue Hare Art Wear's house charms in one of her Facebook sales.  Score!  I love how she mixed so many colors in these charms without coming across as too bright or garish.  It's tough to tell in my picture, but the little striped roofs are actually corrugated... such a fun detail!  I picked a fun stripey pair of polymer clay discs from Humblebeads topped with some bright blue Czech glass to play off the stripes in the charms without getting too heavy.


Not satisfied to just make something with the house charms in my stash, I wanted to play with an idea for constructing some little mixed metal houses.  I brought out my box of Vintaj metal blanks and started to see what might work to bring my seed of an idea into bloom.  For the main body of my houses, I ran some Arte Metal rectangles through my BigKick with an embossing folder and then sanded them a bit to highlight the design..  I loved the lines that made if feel a little like siding or brick.  The roofs were cut from square brass blanks.  I felt a little guilty cutting up the nice finished blanks, but it meant I only had to do a tiny bit of cutting and filing... plus I love the finish on the Vintaj brass.  I still wanted some texture so I used a tiny ball peen hammer all over the "roofs" before I riveted the two pieces together.


Not earrings, but I couldn't help but translate the same house idea into a larger format for a necklace.  This time I used the geometric pattern on the Art Metal roof piece and then used fun flourish pattern for the body of the house made with a brass blank.  I also added a little decorative piece from Vintaj that I painted with their patina paints to give it some color.  At first I wasn't sure where to go from there... or even if I would get a finished piece of jewelry done.  I decided that I wanted it to be a longer necklace, but knew it needed a little more physical weight.  I found a little pewter nest bead from Green Girl Studios that I wire wrapped with some Czech glass and crystal beads that coordinated with the painted flower on the house.  As another perfect little detail, the nest says "home" on the back side.  In keeping with the mixed metal theme, I used some Arte Metal chain right by the pendant and then brass chain at the back.


I hope you'll stop by the Earrings Everyday Blog HERE to see what everyone else was inspired to make!

Monday, March 23, 2020

Honey Do List March 2020

2020 marks the fifth year that my husband Eric has been giving me a design challenge each month to get me out of my comfort zone and to help clear out my bead stash... it's the Honey Do List 2020!  I know that I'm not the only one who loves a good design challenge, so I'm hoping folks will continue to play along with us!

Here's this month's inspiration and what Eric had to say about it:


This is an oldie, from our trip to Prague summers years ago.  This is the huge ornate door to the German Consulate and I really loved the metal work and colors in it.  Not pictured are the many cameras around the door, and I had some reservations about getting close and taking this shot...luckily no German guards bearing submachine guns came storming out of the gates after me!  

The very first thing that came to my mind when I saw Eric's inspiration photo this month was doing something with my collection of Vintaj Patina paints, metal blanks, and embellishments.  I started with two different shapes of brass altered blanks and gave each pair a slightly different texture with hammers.  If you look closely at the background of the door's surface in the photo you'll see some dimpling... I was trying to replicate that feeling.  Next I mixed up a custom blend of patina paints (using Garnet and Earth).  It's not perfect, but pretty close overall.  

For the first pair I used some little flower shaped charms that I cut the loops off of and punched holes in the center for the rivets.  I thought the flowers resembled the round decoration on the door.  The dimpled texture on the brass blanks is pretty similar to what is on the door.  Pretty happy with how that part turned out!  Since the flowers have some dimension to them, they were a little tricky to rivet without flattening, but I did it by using the corner of my bench block.  I added some metallic English cut Czech glass and small plated hematite rondelles.


For the second pair of earrings I used more ornate brass blanks that I did an all over hammered texture before painted.  I used some small brass filigree pieces that are reminiscent of the diamond shaped decorations on the doors.   


The first thing that I actually made for this month's challenge was another pair of earrings... this time making use of my oft-neglected Now That's a Jig!  The color and pattern on these fabulous enameled charms by Blue Hare Art Wear fit nicely with our inspiration.  I wanted to keep the focus on the charms so I kept it really simple.  I used annealed steel wire to make little "hangers" for the charms on my jig and then just hammered them to strengthen them.  I slipped on black niobium ear wires and I was done!


I didn't just make earrings!  I also pulled out some beads that I bought from Allegory Gallery in one of Andrew and William's destash events.  I got the focal and the Czech glass puff coins as a set.  I'm 99% sure that the lampwork bead is by Patti Cahill.  I'm honestly not entirely sure why these caught my attention for this challenge... maybe the deep reds in the Picasso finish glass coins... maybe the rings around the raised dots on the lampwork bead.  Either way, I just went with it!  Adding filigree rounds in brass tones help bring it together.


Not my creation (pretty obviously), I wanted to share these fancy sterling silver brooches from Portugal that belonged to my paternal grandmother.  The patterns in the petals reminded me of the look of the metal door decorations.  I just had to share!


My friend Anna Pierson of Saga Hus doesn't blog so she sent me a picture collage of what she was inspired to make this month.  Isn't this a fun mini-collection of earrings?!  I think my favorites are the asymmetrical pair.


Now it's your turn!  Please add links to/photos of your own creations below.  I love seeing what everyone else is making too!  Check back on April 1st (no foolin'!) to see what Eric has in store for us next month!  

You are invited to the Inlinkz link party!
Click here to enter

Monday, August 26, 2019

Honey Do List August 2019

This is the fourth year that my husband Eric has been giving me a design challenge each month to get me out of my comfort zone and to help clear out my bead stash... it's the Honey Do List 2019!  I know that I'm not the only one who loves a good design challenge, so I'm hoping folks will continue to play along with us!

Here's this month's inspiration and what Eric had to say about it:


This month I've chosen a wall from Nunney Castle in England as your muse.  I love the patterns, shapes, and colors of the lichen, with a little pop of green from the fern.  Hopefully this will point you in an interesting direction for inspiration!

When Eric gave me this month's photo, I knew that I had to use at least one of the pendants that I made at the Adornments Retreat in Erin Prais-Hintz's Petri Dish class.  I had one where the colors and blotchy patterns were just perfect for lichen.  Hooray!!  I paired this pendant (one of my favorites from that class) with lots of yummy Czech glass beads.  Picasso finish beads with their mottled colors felt like a perfect pairing!  I added a few Amazonite rounds to pick up the blue in the pendant.


Next up, a lichen inspired pair of earrings!  There's something about the organic look of these awesome chandelier connectors by Happy Fish Things that made me think of lichen.  The yellow and brown colors work nicely with Eric's photo (the backs are a lovely rich brown too) and they also have great texture.  I added dangles made up of crystal and pearl as a nice counterpoint to the rustic nature of the ceramics.  I think these will be really fun to wear!


I had already made a couple of fun bracelets based on a tutorial from Heather Powers, but as I was finally taking photos of them I realized that some of them worked for the Honey Do List.  Voila!  The flower shaped ceramic button is from Lisa Peters Russ and the others are from Marsha Neal.  I snagged all of them at Bead & Button.  The glazes on the ceramics and the Picasso finish on the seed beads both echo the lichen even if the colors aren't 100% perfect in some of them.  I've just added a couple of these bracelets to the Arts Consortium of Carver County gallery in Victoria, MN and Unearthed Arts in Waconia, MN.


Happy to have some solid lichen representation, I moved on to focus a little bit on that intrepid fern growing from the rock.  It's so amazing how life always finds a way!  I've had a little bag filled with components to make a pair of earrings set aside.  I have no idea why I never got around to actually making them other than that they are for me!  Anyway, I had some silver leafy components from Candice Wakumoto and fun little lampwork beads by Jennifer Ionta.


Next up, another foray into my pile of abandoned projects!  When I was looking for something else in an art bead drawer, I rediscovered a fern patterned and filigree wrapped pendant that I made ages ago in 2012 when I attended a Vintaj Two Day Workshop in Galena, Illinois.  (Seriously, I can't believe it was that long ago!)  Again, not exactly sure why this one was still waiting to become a piece of jewelry, but I'm glad it was.  I had gotten out a bunch of beads that I was considering, but then a light bulb went on in my brain.  What if I made a piece on my Now That's a Jig! to connect the pendant and chain?  I tried a couple of different versions before I decided for sure.  Once I had a shape that I liked, I hammered it for strength and texture and then wire wrapped coils around the component on each side.  To let the pendant shine, I just used unadorned Vintaj brass chain... completely ignoring all of those bead that I'd pulled!  


Ok, this last necklace features a polymer clay focal that I made at Heather Powers' Inspired by Nature Retreat in 2016.  (Seriously, what's up with me, ferns, and unfinished projects?!?)  To create this piece we made a custom mix of polymer clay colors that we rolled out into a sheet and pressed actual fern fronds into.  After baking we used acrylic paint to bring out the fern patterns.  It was a super fun class!  Anyway, after lingering for almost 4 years, I used Heather's "Metal Sketches" technique to decorate the back side of the copper piece I cut to go behind the polymer clay house shape.  (And I totally forgot to get a picture of the back side when I had light!  Doh! Thus the background that doesn't match the others.)  I riveted the polymer clay to the finished back and then wrapped a little brass fern piece around the top.  Since the fern piece was brass, I decided to do a mix of brass and copper plated findings in the yoke of the necklace.    


Now it's your turn!  Please add links to/photos of your own creations below.  I love seeing what everyone else is making too!  Check back on September 1st (our 18th wedding anniversary) to see what Eric has in store for us next month!

You are invited to the Inlinkz link party!
Click here to enter