Friday, March 29, 2013

Teen Jewelry Class Update

This week was a busy one for me, teaching four more teen jewelry classes in four days at four different library branches.  Needless to say, I haven't really gotten any of my own jewelry making done this week in what was left of my spare time!  Tomorrow's another day, Scarlett, and I will try to catch up over the weekend.

Anyway, this rush of activity wasn't just insane planning on our part... we had them all bunched together because it was spring break this week for most of the school districts in my library system's service area.  That allowed us to start a little earlier than if folks were in school so that we could wrap up before closing time.  Since each program ran between an hour and 15 minutes to a full hour and a half, I'm glad that we planned to do these when the teens were out of school.

You can read about our first class here in my earlier blog post.  Over the course of the five classes we had between four and seven teens at each program.  While I realize that those aren't big numbers, anyone who works with teen programming in libraries knows that it's the quality of the program not the quantity of participants.  Ironically, the largest attendance was at our smallest branch on a day where my partner in crime, Maren, wasn't able to be there with me.

While I'm feeling a little tired now, I'm happy that we made the leap and tried this series of programs.  A lot of the teens I met were really excited about this type of program and wanted to know if and when we'd do another jewelry program.  It was gratifying to see these young people enjoying themselves while creating something and learning some new skills.

I've learned a quite a few things from the experience about myself and about teaching.  Here are a few of them:

  1. I'm fairly certain now that teaching is not my real calling, but I can do it on a small scale. 
  2. It is hard to watch a student struggling with something and not just take over and do it for them!
  3. A less ambitious project would have been a smarter choice for the first time teaching.
  4. You get what you pay for... bargain basement priced tools might be what we could afford, but better tools would have made things easier for our students (and for the teachers!).       
Here are some of the necklaces the teens made this week.  I think that they turned out great!


Monday, March 25, 2013

Arts in April Kickoff at the Chanhassen Library

True to my word about stepping things up with Sj Designs this year, I'm taking advantage of another opportunity to share what I do as a jewelry designer with the public.

As a kick-off for a series of "Arts in April" events at the Chanhassen Library, the library is hosting a program on Sunday, April 7th that will feature a variety of artists who also happen to work for Carver County Library.

Initially, I didn't answer the call for volunteers... I was thinking of a more traditional interpretation of the word "art."  I guess I don't always think about what I do as art or myself as an actual artist.  To me, artists are the painters, the potters, the photographers... not me.  It's not that I don't think of my jewelry design as creative or even artistic, I just haven't made the leap to consider it actual art.  Perhaps I'm selling myself short.  What do you consider as "art"?  What kinds of things "count"?  I'd love to hear your thoughts.

Anyway, after another nudging email targeted at myself and a few other individuals on staff, I decided to sign up to participate.  From 2-3 pm on April 7th I'll be at the Chanhassen Library showing off some of my jewelry and maybe talking a little bit about what it is I do.  I'm looking forward to seeing what sorts of art my co-workers are creating.  As I understand it, the participants will be speaking a little bit about their art, how they got started, what inspires them, etc.  Folks can take a look at what everyone brought and talk to the artists as they wander through for a closer look. 

Now I just have to decide which pieces to take with me and what I want to say.  Maybe this one... I think I'll focus on some spring inspired things since I'm ready for warmer weather!
For more information on the rest of the events planned for "Arts in April" check out the Library's Website or click HERE.  The programming is funded by Minnesota's Arts and Cultural Heritage Fund.


Friday, March 22, 2013

Inspired by Reading Book Club

I know lots of creative people and many avid readers (I AM a librarian after all!), so I thought I'd share this really interesting creative opportunity.  Andrew Thornton, who is one of my favorite bloggers, has created an unusual book group/creative challenge in the Inspired by Reading Book Club.  You can check out his blog post all about it and find out how to join if you are so inspired.  Link to the Facebook group HERE.

The basic idea is that each month the group will read a book and then create some sort of creative response to share with the group.  You don't have to create jewelry...it can be any type of artistic interpretation.  This is a fun and totally different kind of creative challenge for me so I'm excited to take part!
A pic of the upcoming titles from Andrew's blog.
The first book for April is Paris to the Moon by Adam Gopnik.  I checked a copy out from the library yesterday and am excited to dive in.  I keep saying that I should try to read more adult books so this could help me out in that area.  I even own Bridge of Birds and have never read it, embarrassing since we bought it back in 1998 or so!  I hope some of you might be inspired to play along too!


Thursday, March 21, 2013

Resin Update

I spent a good portion of my day off this week working on turning those resin-filled and covered pendants into full-fledged jewelry.  I haven't finished with all of them, but I thought I'd go ahead and show you what I've made so far.

I'm pretty pleased with how they turned out...take a look.  I will try to get these up on my Etsy site soon (along with more pics of each necklace).


The honey bee necklace below is my favorite of the bunch.  It was also the most work from start to finish!  The little dangle hanging off the pendant is a piece of aquamarine that I wire wrapped.  It's the first time that I tried wrapping the wire over the top of the bead and only the second time I've attempted a spiral swirl.  These are some of the best looking and most consistent loops that I've made in a long time (I know I'm way more critical of my work than anyone else will ever be!).  I guess practice really does make perfect!


I had an odd little moment while working on the bee necklace.  I realized that all of the glass and the aquamarine were all from some of my very early jewelry projects.  In fact, the amber colored glass and aquamarine were both from the project that taught me how to make decent simple loops in the first place.  It was a necklace adapted from a design idea from Fire Mountain Gems, and I made it way back in 2009.  You can see the inspiration design HERE.  I still wear that necklace (although the sterling silver jump rings are in serious need of polishing at the moment) and it just seemed kind of neat that some of its leftovers were joining up in this new design so many years later.  

I think that this isn't too shabby for a day's work!

Sunday, March 17, 2013

Experiments with UV Resin

In December 2011 I took a class that taught me the basics metal stamping and using UV resin with what they call transfer sheets (more on that later).  The UV resin can be used in layers to fill pendant bezels and is a little less scary than other resin products because you don't have to mix two parts together in perfectly equal proportions like you do with epoxy resin products.
My favorite pendant from class.
Anyway, I was pretty excited about playing with these new techniques and bought a lot of supplies to do just that.  Is anyone shocked?  I made a couple of pieces early on and then mostly shoved these supplies to the side as I started trying some other new things.  I've had a couple of ideas rolling around my brain for a while that involved digging the resin back out.  Today, on this sunny but cold Sunday, I finally had time to pursue them!

Any time I have to bring out something out of the ordinary like a special tool, paints, or my rubber stamps I try to make the most of that effort and work on several projects at once.  My main project involved some cool scrapbook paper with a honeycomb pattern, a brass bee charm, and some flat back crystals... but I figured I should make the most of having my resin supplies out so I made a bunch of little pieces.

I'll show you what I made then talk a little bit about the process.  Here are the finished pieces.

Resin can be used in a variety of applications for jewelry making, but I was focused on doing just two things.  For some of my projects (the four on the left of the photo above) I cut out scrapbook paper and glued that into the bottom of my bezel finding.  The next step is to use a sealer over the top of the paper to protect it from the resin and to keep the colors from bleeding or blurring.  Once it is dry you are ready to carefully pour the resin into the bezel.  Often you need to do this in a couple of layers.

The rest of my projects were using components that have a raised platform design to them (the three on the right up above).  I used transfer sheets on top of that flat surface, sealed them, and then poured a layer of resin over the top.  It's kind of amazing how the viscous resin will follow the edge of these pieces and not drip over if you carefully rotate your piece.  Since the transfer sheets are printed on a film, once you apply it, you can see through anything that looks white when it is on its original backing.  If you paint behind the transfer sheet you can see that color come through to varying degrees depending on your design.  The ones I was using were black (or dark blue) and clear so I chose to leave the metal background as is for a cool effect.  I love how the silver and copper pop through!

For both applications, once the resin has been applied you want to make sure that there are no bubbles and that the resin is spread evenly across the piece.  The neat trick I use to get rid of those pesky bubbles is to take a lit match and move it back and forth just above the surface of the resin.  A cool chemical reaction causes any bubbles to rise to the surface and pop.  Just make sure to have a little cup of water nearby to douse the match and don't get so involved in looking for bubbles that you burn yourself!  (Sadly, I speak from experience!)  Once you are happy with how it looks, you just put it under a UV light (like the ones they use at some nail salons) for a few minutes to cure.  In theory you can just let it cure in direct sunlight, but Minnesota winters don't really work for that too well!
A few of my pendants curing under the UV light.
After the first layer of resin had cured, some of my pendants had either air bubbles or uneven surfaces.  Luckily, you can often fix those little imperfections by adding another layer of resin and curing again.  For my honeybee pendant, I had a couple of air bubbles and marks that I couldn't get rid of in this fashion.  Fortune smiled upon me though since I'd been planning all along to add items into the resin.  The judicious placement of the bee and crystals allowed me to hide those problem areas!  See for yourself:


The bee's wings and the tops of the crystals actually peek out of the resin giving it a three dimensional feel that is fun.  I wish the crystals were a little less covered, but I had to add an extra layer of resin to even things out and they got a little submerged.  You want the crystals to be out of the resin as much as possible to maximize their sparkle.  Since I wanted the crystals to seem like honey droplets, it's not a huge loss.  I'm just learning here so things aren't going to be perfect every time.  

Since I'm pretty much relearning how to use resin, and it can be a bit temperamental, these pieces took up the better part of my afternoon.  I know that I will get better at it as I keep experimenting and playing.  I feel good about my day's work and I have some great new handmade pendants to go into my jewelry designs!


Friday, March 15, 2013

Jewelry Making for Teens at the Library

For once, I'm actually writing about both my passions... jewelry making and libraries.  In my day job, I work as a collections and youth services librarian and most of my professional life has been spent with a focus on teen services.  This week one of my co-workers and I did our first in a series of jewelry making programs at all of our library branches.

This whole thing started out last fall as one of those crazy ideas that I threw out there and never thought would stick.  I was surprised when my co-worker and I actually got the green light to pursue doing a series of jewelry making programs for teens.  Because of the funding cycle for teen programs, we plotted out the basic idea and bought our supplies almost six months ago.  Per my usual m.o., I felt like we had all the time in the world to get things together... then, suddenly, our first program was bearing down on us!

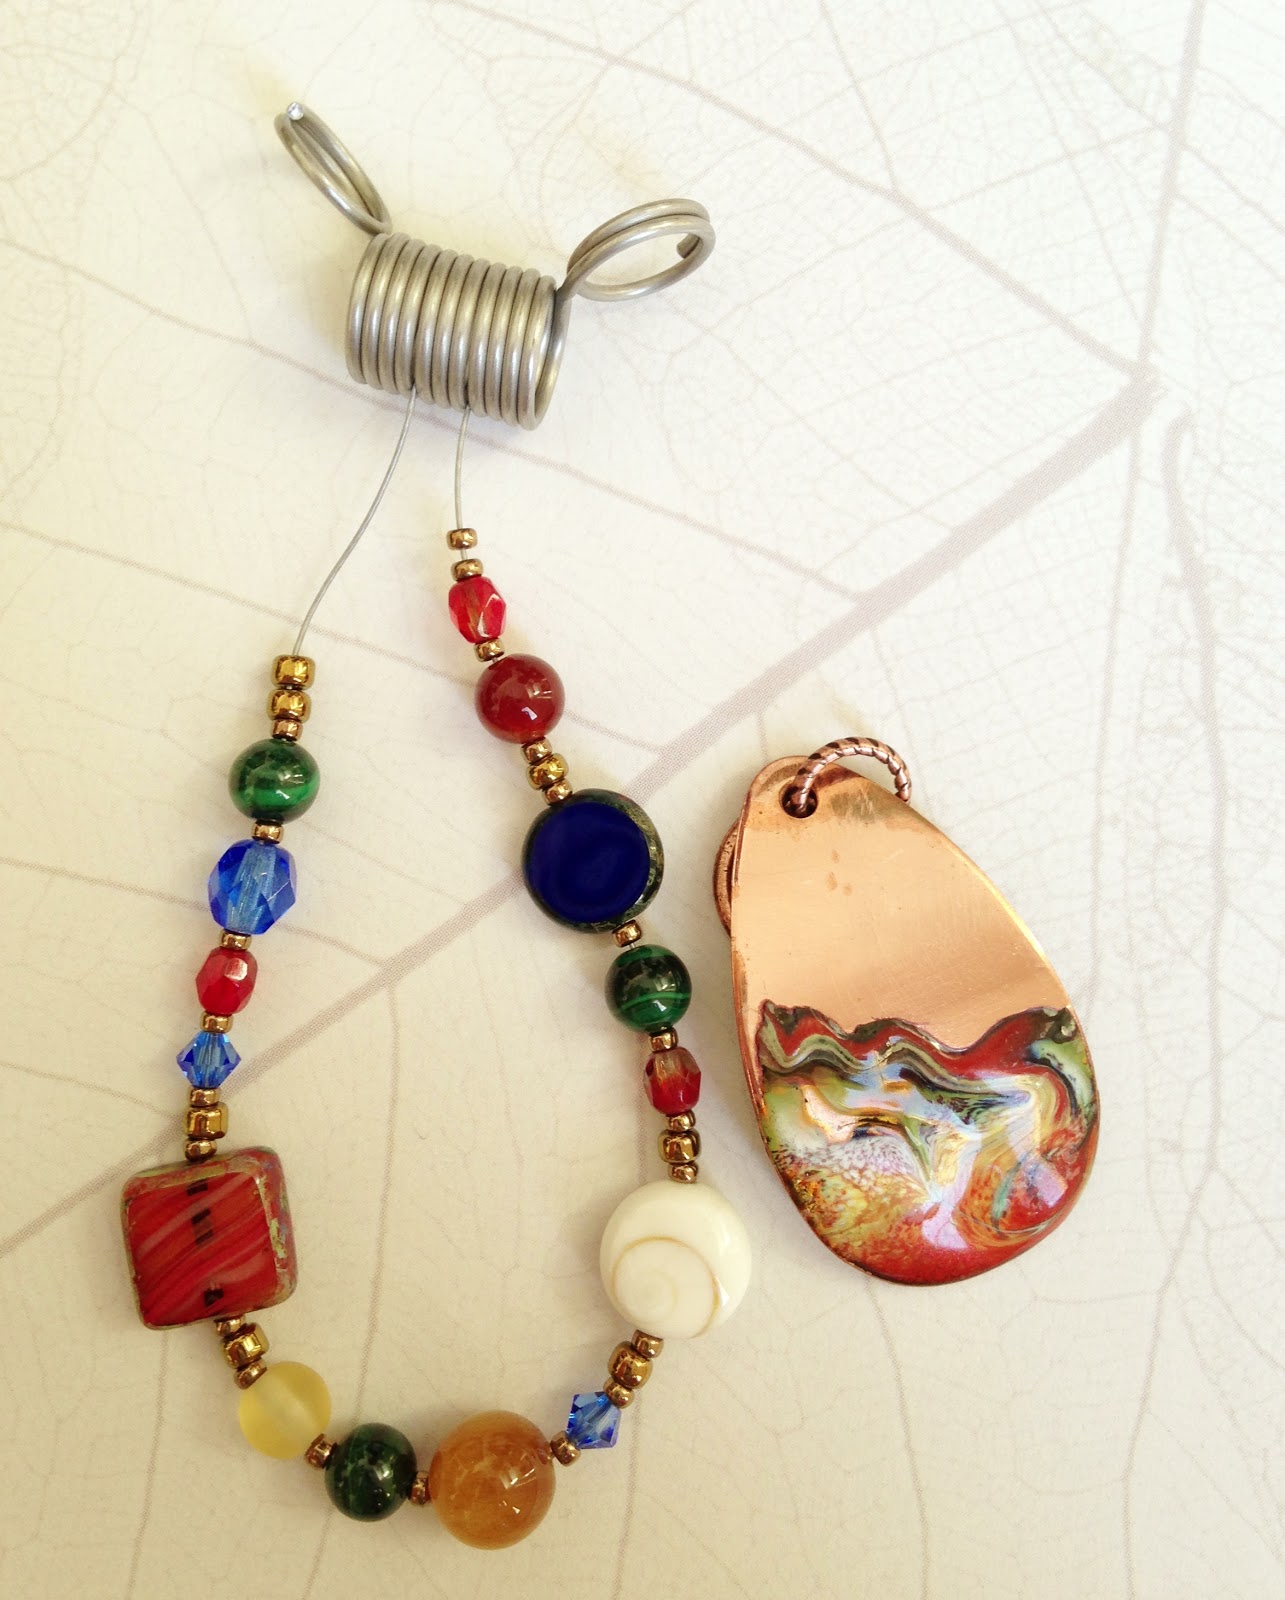
After tossing lots of different ideas around, we decided to teach the teens how to make a front clasping necklace with a book cover charm pendant and little dangles hanging from the chain.  We also hoped to have them make coordinating earrings.
The sample I made to publicize the programs.
Our first program was this week and I think it went pretty well!  Neither of us had ever actually taught any jewelry skills before (although I've taken a number of classes) so this was new territory for both of us.  Due to conflicting schedules we didn't get a chance to do a dry run beforehand, so our first program attendees were also our guinea pigs.  I realize that this is not the ideal way to approach teaching, but it is what it is!

I made up a few handouts for the participants, the main one on how to make a simple loop was adapted from instructions from Fire Mountain Gems and Beads.  I also gave them a list of resources for purchasing jewelry making supplies as well as library materials on beading.
The table set up for the class.

We started by explaining what everyone had at their station and outlining what we'd be doing in the class.  At that point we had the girls pick out the book pendant they wanted to use (big shout out to my co-worker for making them in advance for us!) as well as beads to go with their choice. 

Anyone who has ever made jewelry knows that learning how to make a decent loop can be a frustrating and steep learning curve.  Most of the class was spent showing the girls how to make loops and helping them to make the bead unit dangles for their necklaces.   We had five teens signed up and most of them got the hang of it pretty quickly.  Were they the most beautiful loops ever?  No, but neither were my first attempts.  I think that it would have been much easier for them if we could have afforded higher quality tools.   
Every now and then, one of the other library staff members would wander through and check out the progress.  They were surprised at how quiet most of the girls were, really concentrating on what they were doing.  I think most of the staff was jealous and wanted to join the fun and make something too!

Once everyone had most of their bead units made, we taught them how to open and close jump rings and loops so that they could put the clasp on the chain, attach their pendants, and add in the dangles.  Voila!  Finished!

Here are the finished designs from our inaugural program... I think they all did a great job!


I mentioned before that we had hoped to have them make earrings as well... time just didn't allow for that so we will nix that from the rest of our planned programs.  We also learned that having registration set at ten might be a little ambitious for novice teachers.  Luckily, five was just about right for our first time out.  All the girls but one really seemed to be super interested and excited about the program and the end result.  A couple of them said at the end that they thought they had found a new hobby!

Overall it was a great first teaching experience.  I think we learned a lot on how to go forward and I feel good that we provided a quality program that was interesting and something different from the usual.

Wednesday, March 13, 2013

March Art Bead Scene Challenge

Once again I'm participating in the Art Bead Scene's monthly design challenge.  This month, the challenge artwork is by Franz Marc, a German Expressionist painter.  You can find out more about the artwork and artist over on the ABS blog.


Deer In the Forest, 1911
Franz Marc
Oil on Canvas, 100.97 x 104.78 cm
Philips Collection, Washington DC, USA

As you can see, the palette is filled with a whole rainbow of rich colors...so many options to choose from!  Since this is an art bead challenge, I started by digging out my boxes of focal beads and artisan clasps to see what I had that would fit the bill.  I found a lovely enameled copper pendant by Becka Beads out of Maple Lake, MN.  I had bought it (and a bunch of others) when she had a shop at the Minnesota Renaissance Festival.  The colors worked perfectly and I thought the swirls of color matched the feel of the painting as well.

I had my art bead...now to figure out where to go with the design.  The colors that jump out at me the most are the shades of green and the orangey reds.  I wanted to focus my colors there, but I didn't want to totally ignore all the other great colors in the painting.  Plus, I've really been wanting to get out of my monochromatic rut.  So, to that end, I pulled out a variety of blues, yellows, and even some cool off white shell beads with a swirl on them to add to the mix of possibilities I had already started.

Originally I thought I'd do something with copper wire links and chain...maybe add in some of the new copper plated bead caps I bought from Nunn Design.  As I sat there staring at my pile of beads, willing them to bring themselves into some order, I suddenly wondered if stringing beads might be the answer.  I grabbed a scrap of beading wire, dumped out some bronze colored seed beads to use as spacers, and started stringing my motley collection of bead shapes and colors.  Here is the result of this little experiment...


I showed my progress to Eric (who often acts as my color and design consultant) and we decided that we liked the idea, but needed to nix the bright blue Swarovski crystals and Czech glass in favor for more subtle blue beads.  The blue is very present in the painting, but not really so much in my pendant.  Back to the drawing board to grab some more beads to add to the mix and I had my design direction.

I wanted to do a front clasp since I had a great leafy branch toggle from Nunn Design that would add an organic touch to the necklace.  Usually when I string beads I tend toward a symmetrical pattern...or at least something a little more subtle in the mixture of colors, sizes, and textures.  I ended up using a variety of Czech glass beads, malachite, carnelian, lapis, shell, and a couple of varieties of jasper. 


This necklace is a bit out of my normal comfort zone, but I like the end result.  I think the variety of colors and shapes in the beads, along with the swirls in the shell bead and pendant, mimics the frenetic color energy in the inspiration painting.

Monday, March 11, 2013

Art of Science Creative Challenge

So, apparently, I just can't pass up a good design challenge.  I was tipped off to this cool one from a blogger that I follow, Andrew Thornton, and I'm going to give it a try.


I know that I have a lot of creative friends, so I thought I would share this in case any of you are also inspired by this amazing photo of Orion's Nebula.  As someone from "Rocket City" (aka Huntsville, Alabama) I'm pretty intrigued by the wonders of outer space.

All you have to do is create something that is inspired by the photo and post it on your blog.  It can be anything you want... a painting, pottery, poetry, jewelry, music... whatever you can dream up!  If you don't have a blog, Tara Linda will post it for you.

The reveal date is April 18th.  To find out all the details and get involved, CLICK HERE.  It should be really interesting.  I'm already plotting which beads I'll be focusing on.

Thursday, March 7, 2013

Vintaj Morning Mist Design Challenge

Those of you who know me fairly well have already discovered that I've been enjoying participating in various design challenges.  Vintaj Natural Brass does a challenge every month on their blog that I love to take part in whenever I can.  It's been a few months since I've done one of these, but I'm back in action this month with their "Morning Mist" challenge!

The only real design parameter for the Vintaj challenges is that your piece showcases a good percentage of Vintaj Natural Brass Co. findings and embellishments.  Vintaj makes a wide variety of products in brass, copper, and arte metal (a blackened color) so there's plenty to choose from in the creative process.  Each month they award a prize of Vintaj goodies to the designer who gets the most votes and also to an editor's pick winner.  I've got my fingers crossed that someday I will be chosen!

I really didn't think that I had time to do another challenge piece this month with all my preparations for the Artsy Market sale, but I figured if I could make something I was willing to part with, then it wasn't really diverting my energies away from the show. 

I looked through my supply of focals and art beads and came across this great enamelled copper pendant by Becka Beads that I had bought from her back when she was still selling at the Minnesota Renaissance Festival.  The swirling blues and greens over the copper were just perfect for a misty sunrise...now to figure out how to incorporate enough Vintaj peices to make it elligble! 

Close up of pendant and my initial design idea.
Since the pendant already had copper wire bail with a gemstone I wanted to include some of the gorgeous Artisan Copper from Vintaj.  I haven't built up quite as much stock from their copper line, so I had fewer options to play with.  This ivy piece immediately caught my eye--now I just had to think about the best way to attach it and the pendant to the rest of my necklace design.  I initially thought about hanging the pendant from the ivy as seen in the picture above.  With the longer bail, it just didn't look quite right to me, so I played around with other ideas.

Thinking out my design.

In the end I decided to do a mix of copper and brass elements (the darkened edges of the pendant have a color that's similar to to the natural brass).  I added some amazonite beads (both nuggets and rounds), as well as some pale green gemstones from a mixed strand, along with some other little pops of copper.  I liked the way the chunkier nuggets balanced out the ivy connector for some nice asymmetry.  

The finished product!

If you want to see the rest of this month's challenge entries and vote (hopefully for me!), check out the blog here.  Mine is number 9.

I think I'm drawn to these challenges because they often force me out of my comfort zone and make me think about my beads and findings in a totally different way.  I think our brains all need that on a regular basis to keep us sharp and nimble.

As a P.S. to this post, I sold this necklace at the Artsy Market!  It was one of my more expensive items (due to the art bead and other materials used) so I was thrilled at making such a big sale!

Tuesday, March 5, 2013

Size Does Matter

So, I'm not always the best at really understanding what size a bead actually is when shopping online.  Sometimes I just get drawn in by the shape and color of a gemstone bead and fail to pay attention to exactly how many millimeters long and wide it measures.

On more than one occasion, Eric has just stood there shaking his head as I unpack an unexpectedly gigantic strand of gemstones wondering what in the world I'm going to do with my new oversized monstrosity!  Here are a couple of examples of beads that were much bigger than I had expected.

Going clockwise from the top, we've got a 18-20 mm amazonite rondelle, a 20 mm carved Brecciated Jasper piece, and a 13x18 mm muscovite teardrop along with some change for size comparison.  Now there are certainly much larger beads out there (such as the 60x40 mm bronzite pillow bead that I got as a free gift from Lima Beads for instance),  but when you were originally imagining stringing a whole necklace out of these puppies, their size can come as quite a shock!

In all three cases, I found my solution only after letting go of the idea of needing to use all the beads at one time in one necklace.  First up, two different takes on a long necklace using the amazonite with a chain fringe for movement at the bottom. 


Next, a simple front-clasp necklace of two sizes and colors of seed beads featuring the carved jasper as a pendant.  
Last but not least, the item that was the hardest to figure out...the muscovite teardrop.  It's not terribly big, but for the shape of the stone and what I had originally wanted to do with it, it threw me for a loop.  These languished in my stash for years until I embossed and painted this brass blank.  Once I added a sheer coat of bronze patina to tone down the super bright orangey pink it started as, I knew just the bead to go with it!  
These pictures were hastily taken before my holiday sale last December and don't do this stone justice at all.  The color is really rich and it has a lot of crystalline sparkle to it that you don't see here.  


I'll be the first to admit that it has sometimes taken me awhile to come up with a solution for working with those oversized beads, but I'm often at my best when I go into problem solving mode.

Do any of you beaders/jewelry makers out there have this problem too? or am I just math challenged?  I'd love to hear someone else's size related missteps!


Sunday, March 3, 2013

Artsy Market Recap


I know that I've been talking a lot in this blog about the Artsy Market...that's because it's been kind of a big deal to participate in my first sale that's open to the public.  It's a different thing putting yourself out there for the whole world to see and judge as opposed to just sharing with friends and family.

Over the last month I have put a lot of extra hours into making Sj Designs an actual business...creating tons of new jewelry, and getting my display goodies all ready.  I feel bad and have to make apologies to my husband for keeping him up too late beading too often lately (and for talking jewelry almost nonstop)!

Friday night we were able to get into the Waconia Farm Supply Garden Center to start setting up.  I was super lucky to get a corner with some built-in adjustable shelving for added display space (it turns out I was also lucky not to be on the sunny and hot side of the building but I didn't know that yet).  There was a bit of semi-controlled chaos as all the vendors tried to figure out their display space and traffic flow...I think that Summer's signage had gotten moved around a bit along the way which didn't help.  Anyway, Eric and I loaded in my display items and set up as much as we could, then headed home for dinner and last minute details.  I had tons of jitters, but at this point I had done all that I could possibly do to prepare.


After all this build up, last Saturday was finally the day!  Anna met me and helped finish getting all my jewelry arranged and on display.  Before we knew it, it was 9:45 and there was a huge line of people waiting to come inside and check out the Artsy Market (or maybe just get their goody bag and flee).


Traffic was steady throughout most of the day and I made a fair amount of sales.  Going into this with little to no real expectations, I was just happy to have made up for the cost of my exhibitor fee and display items.  Success!!

Me in my "booth"
It was great to see so many of my friends and family who stopped by during the day.  I appreciate your support (and your purchases!), but I have to say that the real thrill was making my first sale to a total stranger.  I know that may sound sort of weird, but there it is.  Someone who had never met me and had no relationship with me whatsoever saw something that I made that they loved enough to buy.  I'm not going to lie, it made me a little giddy!

Anna and I at the end of a long day...happy but tired!
All in all it was a great day and a good first experience with this kind of sale.  I will know more what to do and expect next time....and there will be a next time!  After collapsing into a tired puddle Saturday night, today is a new day so it's time to clean up and start working on some new designs.